Making your first plugin
In this guide we will cover:
- Setting up development environment.
- Creating a plugin project.
- Writing a basic plugin.
Installing .NET Core SDK
Install the latest .NET Core SDK from here (you should get a dotnet-sdk-xxxxx.exe).
Installing the IDE for coding
After setting up .NET Core SDK, we will need to install an IDE. The IDE provides us an environment where we can code our plugins.
Visual Studio Code
You can install install Visual Studio Code with the Omnisharp extension for developing plugins. Visual Studio Code is much lightweighter and faster then a full Visual Studio installation. It is optimal for small-mid size projects.
Visual Studio
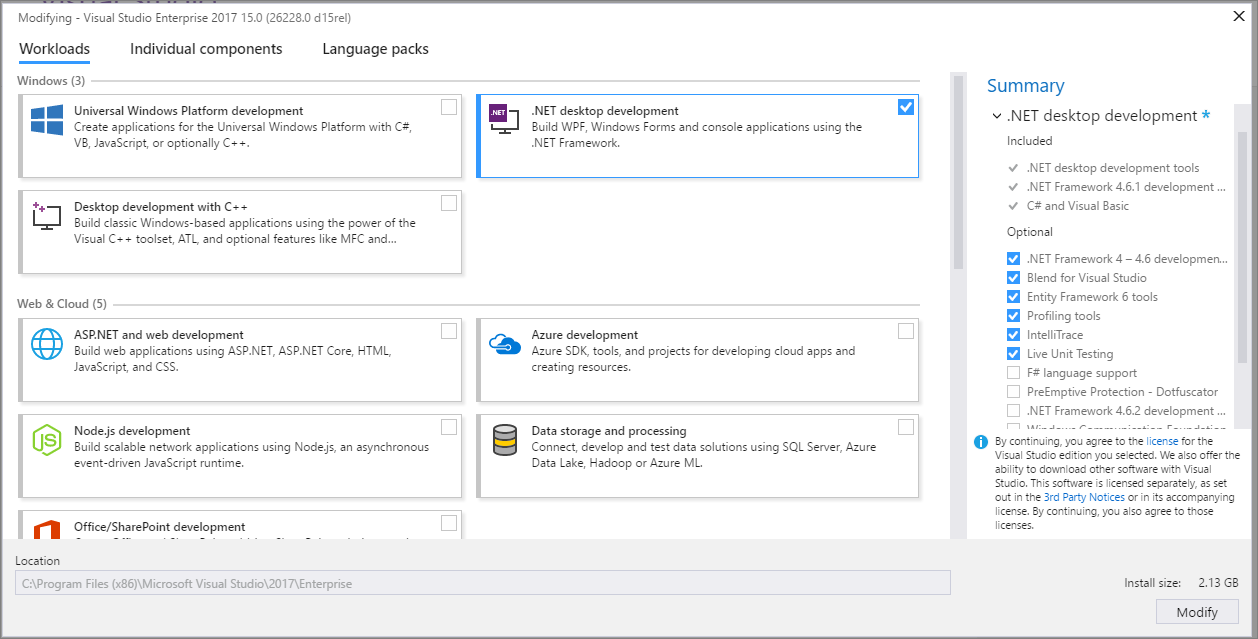
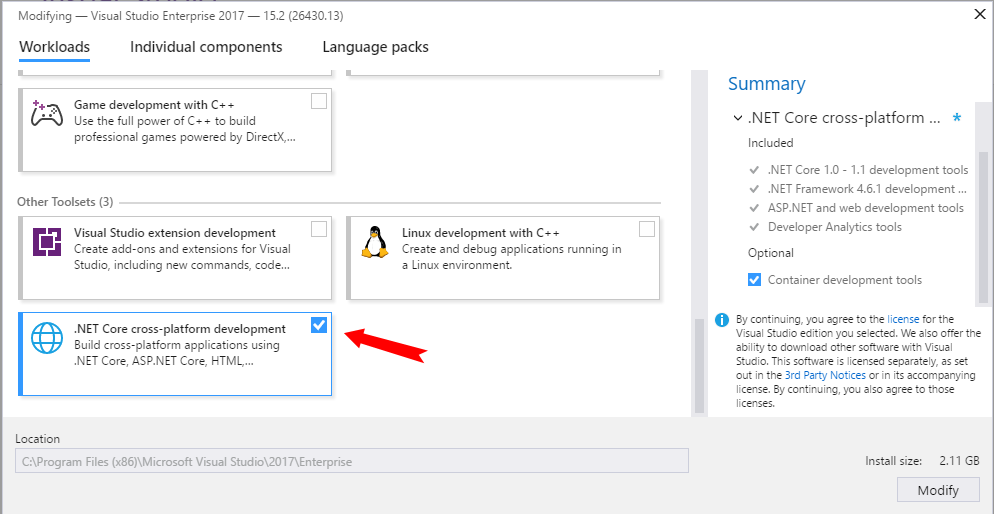
If you want a full IDE experience, download and install Visual Studio Community Edition. When the installer starts, select "Visual Studio 2017 Community Edition" (or newer). After that select the .NET Core cross-platform development and the .NET Desktop Development options like shown below.
Generating the Plugin Project
Start cmd or Powershell and navigate to the folder where you want to create the plugin project.
E.g.
mkdir C:\Users\<Username>\source\repos\MyPlugin\
cd C:\Users\<Username>\source\repos\MyPlugin\
After that, install the Rocket Plugin Templates for .NET Core SDK:
dotnet new -i "Rocket.Templates::*"
Finally, you can generate the plugin project with this command:
dotnet new rocket-plugin [--name <ProjectName>] [--FullPluginName <FullPluginName>] [--GenerateConfiguration <true/false>] [--GenerateCommands <true/false>] [--PluginType <Universal/Unturned/Eco>]
To get the full help for the command, you can use the --help switch like this:
dotnet new rocket-plugin --help
Example
If you want to create an Unturned plugin project, you can use the following command:
dotnet new rocket-plugin --FullPluginName "My Unturned Plugin" --PluginType Unturned
See Also
To get more information about Rocket Plugin Templates, visit Rocket.Templates on GitHub.
Making a plugin from Scratch
First create a new ".NET Standard Cross Platform Library" in Visual Studio.
After that rename the pre-existing Class1.cs file to MyPluginMain.cs from the solution explorer. Add the following usings the top of the file:
using Rocket.API.DependencyInjection;
using Rocket.API.Eventing;
using Rocket.Core.Eventing;
using Rocket.Core.Player.Events;
using Rocket.Core.Plugins;
using Rocket.Core.User;
Your file should now look something like this
using Rocket.API.DependencyInjection;
using Rocket.API.Eventing;
using Rocket.Core.Eventing;
using Rocket.Core.Player.Events;
using Rocket.Core.Plugins;
using Rocket.Core.User;

namespace WelcomeMessager
{
    public class MyPluginMain
    {

    }
}
We'll start by making MyPluginMain inherit from Plugin:
public class MyPluginMain: Plugin<MyPluginConfig>
{
    public MyPluginMain(IDependencyContainer container): base ("Welcome Messager", container)
    {

    }
}
'MyPluginConfig' will show up as an error so we now create a second class called MyPluginConfig:
public class MyPluginConfig
{
    public string WelcomeMsg { get; set; } = "Welcome to my Server";
}
This should remove the previous error warning. Any variables added to this class will be configurable by the plugin user.
Now that our configuration is setup we'll add an event listener by creating a new class which will inherit the events we need:
public class EventListener : IEventListener<PlayerConnectedEvent>
{
    private MyPluginConfig config;

    public EventListener (MyPluginConfig config)
    {
        this.config = config;
    }

    [EventHandler]
    public async Task HandleEvent (IEventEmitter emitter, PlayerConnectedEvent @event)
    {
        await @event.Player.User.SendMessageAsync(config.WelcomeMsg);
    }
}
We pass our config through the constructor so it can later be used when we handle the event, in this case our event is simply sending a welcome message to the connected user.
To finish the plugin we need to register our event listener. To do this we go back to our MyPluginMain class and add an OnActivate like this:
protected override async Task OnActivate(bool isFromReload)
{
    EventBus.AddEventListener(this, new EventListener(ConfigurationInstance));
}
The plugin is now done and it should look something like this.
using Rocket.API.DependencyInjection;
using Rocket.API.Eventing;
using Rocket.Core.Eventing;
using Rocket.Core.Player.Events;
using Rocket.Core.Plugins;
using Rocket.Core.User;

namespace WelcomeMessager
{
    public class MyPluginMain : Plugin<MyPluginConfig>
    {
        public MyPluginMain(IDependencyContainer container) : base ("Welcome Messager", container)
        {

        }

        protected override async Task OnActivate (bool isFromReload)
        {
            EventBus.AddEventListener (this, new EventListener (ConfigurationInstance));
        }
    }

    public class MyPluginConfig
    {
        public string WelcomeMsg { get; set; } = "Welcome to my Server";
    }

    public class EventListener : IEventListener<PlayerConnectedEvent>
    {
        private MyPluginConfig config;

        public EventListener (MyPluginConfig config)
        {
            this.config = config;
        }

        [EventHandler]
        public async Task HandleEvent (IEventEmitter emitter, PlayerConnectedEvent @event)
        {
            await @event.Player.User.SendMessageAsync(config.WelcomeMsg);
        }
    }
}
You can now build the plugin and upload it to your testing server.
Best Practices
Only reference game specific packages (e.g. Rocket.Unturned) if you really need to access the game's API. If you only reference Rocket.Core and Rocket.API, your plugin will directly work on any game that supports RocketMod. Such plugins are called universal plugins.
Do not use static plugin instances, instead always pass instances by reference. The reason for that is that Rocket can dynamically create and destroy your plugin instances, which could result in wrong instances being used.